Mini Pumpkin Patch Garland
Brenda K.B. Anderson
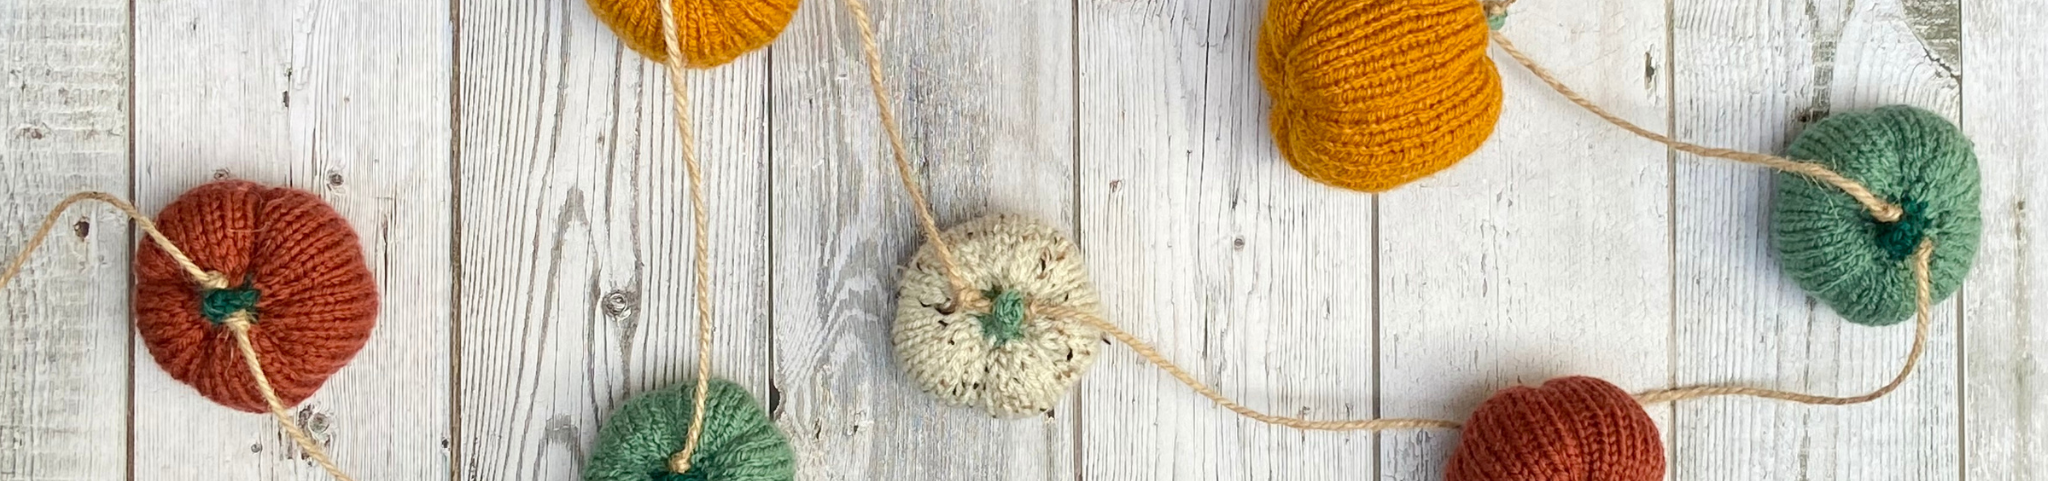
Learn how to knit charming mini pumpkins perfect for a festive fall garland. These cute pumpkins are a great way to use up scrap yarn, and you can make as many as you like to decorate your mantel, doorway, or any cozy corner for a touch of autumn flair. Click here to download the free pattern.
Hello everybody. Welcome to our live event. My name is Brenda KB Anderson, and I design knit projects and crochet projects and sometimes sewing projects, and today I'm gonna be working on this adorable little knitted pumpkin garland. You can see it hanging up here behind me, all these little pumpkins, um, and then, I also have some here on the table that you guys can see. There are four different sizes, but it's really all the same instructions, and so it's very, very simple to just memorize how to make these little pumpkins, and I'll be talking you through, um, all the way from the beginning to the end and any other changes for the different sizes.
We're just going to be talking about those as well. Um, this is a great project for those of you who are newer to knitting, um, especially if you've never used double point needles before, you're a little nervous to try using double point needles. Um, I'm gonna be using them here in this, uh, live event, and, um, I'll be talking you through the whole process. So, um, these pumpkins are really pretty fast to make. Uh, they take an experienced knitter probably somewhere around one hour, an hour maybe an hour and a half, and then, um, a little bit longer for somebody who is newer at it, you know, I would allow like a couple hours or two and a half hours or something per pumpkin.
So this garland is made so that you can, or the instructions are written up so that you can adjust it to whatever length that you need, however many pumpkins you want to make. I mean really it's just as simple as threading all the pumpkins onto the cord and spacing them how you'd like them to be for whatever distance you're making it for. So maybe you're gonna make it for over a doorway or a mantelpiece or, you know, along some, you know, a piece of furniture or a railing or something like that. That way you can just figure out how many pumpkins you need and or just start making pumpkins and then decide that's enough pumpkins, I'm gonna string them up onto, you know, wherever you want to put them. So we'll be talking through that all the way um so that you guys know what to do um at the end.
We'll talk about the finishing after we make these little pumpkins and how to string them, string them up and make sure they don't slide all over the place. All right, um, I'm glad that you guys are here. Of course this is a live event. If you want to say hi, You can drop that in the comments. Tell me.
Where you're knitting from, tell me projects you're interested in making. Or, um, you know, of course, if you have any questions, If there's something that I'm doing that isn't very clear, You need a little bit more information about something, go ahead and drop that in the chat. As well, and I'll try to answer that during, um, this hour's event. So, all right, let's start by just talking about the materials you're gonna need. So, first of all, there is a download which has instructions and some pictures in there for you as well.
Um, but it's got the complete directions and it has specifics, uh, like exactly what, you know, what kind of yarns I used and stuff for my little scrappy pumpkins, which, oh, I forgot to mention this is a great project for using up scraps. So don't feel like you have to go buy a bunch of yarn at the store. You can just raid your stash and find, You know, things that'll work for pumpkins, um. You know, obviously if you don't have anything that fits the color palette that you want, Then, of course, you can go to the store and go shopping, but I'm just letting you know, Like I just looked through my stuff and found some colors that I thought looked nice together and looked like autumn to me, and I'm using those. All right, so you can go ahead and download this.
This is a free download for everybody. The link is in the description. Um, and that will walk you through the whole thing. So, you know, in case you are just watching this now, Not working your way through, you'll have all the information when you're done. Of course, you can always go back and watch this live event as well, Um, if you need a little refresher on some of the techniques that we're gonna be doing.
Um, and then also you're gonna be needing, of course, some yarn. I am using a worsted weight yarn, and so I chose, because I was just using scraps. I have like a merino wool, I have 100% acrylic, and then I have like a mix of different fibers here, um, and this little white pumpkin, but all of them are a similar weight. They're all worsted weight, which is, um, a number 4. Um, and for those of you who don't know what I'm talking about when I say a worsted weight or number 4, it's like the most prevalent yarn in that you would find, like, in a big box store.
Um, that people oftentimes use for making Afghans, um, or sweaters, uh, it's, I can just show you like what a strand of it looks like, like this. It's just, it's basically a medium weight yarn. Um, but you can use whatever yarn you want to. That's going to affect the size of your pumpkin though. So, um, you know, if you're gonna use a chunky weight yarn, you're gonna get a larger pumpkin.
So just think about how that would look on a garland or maybe you don't want to make it for a garland, maybe you just want it for a centerpiece or something like that so that that wouldn't even matter. Um, but just think about that and how the proportions are gonna work with whatever, you know, whatever you're gonna be using these pumpkins for. If you, if you have like some sack white yarn leftovers or other. You know, fingering weight yarns, you can use those, you could double them up to make them a little thicker, or you can make teeny tiny little pumpkins, which would be incredibly adorable. So, uh, you know, just something to think about.
If you already have some scraps and colors you like, it's just not the right yarn weight. You can just sort of adjust your needles accordingly to get a nice firm fabric and then go ahead and use whatever you have. All right, so we, we need some yarn, and you need about 35 yards for the largest pumpkin. You'll need less for the smaller pumpkins. Um, this is of the main color, and you only need about 2 yards for the contrasting color, which is this little stem bit here.
Uh, and then you're going to be needing, of course, knitting needles, and I'm using these double point needles throughout. So, these are a size 6, which is a 4 millimeter needle, um, and, uh, but you know you can use whatever needle you need to in order to knit up a nice firm gauge because it doesn't really, you know, you don't have to get exactly the same gauge. Your pumpkins don't need to be exactly the same size as mine, you know, it's not like somebody's wearing this. It's not a project that you know where the gauge really matters, um, but what does matter is that when you knit up your fabric. That is a nice firm fabric and that you don't see a lot of holes between your stitches.
Even when you stretch it, you don't want to see that stuffing um showing between all of your stitches. So that's really more important than getting the exact gauge. OK, um, oh, and then, of course, you're gonna need the stuffing. So, I just, I'm using this fiber fill stuffing, and this stuffing, this is a little bit stickier than what I usually use. This is, I think it's called dry, something with the word dry, and it's like, uh, uh, fiber filled dry.
Something, um, and I was like, what does that mean? And I got it, um, and it is very sticky. It really molds incredibly well into the pumpkin, but the one drawback is that this stuffing, it's very textured and it kind of grips onto itself a lot, so. So I found when I was doing the finishing steps where you make these sort of long stitches to create that pumpkin shape, and we're sliding a needle through the pumpkin through the stuffing, my needle was kind of getting stuck in there a little. You can definitely push it through, uh, but I did notice that this fiber fill is not as slippery as the kind that I normally use so this just.
You know, you'll see me switching to a different needle that's a little bit sharper when we do that last step, um, instead of normally when, um, when I'm, you know, weaving in ends or sewing through something that I've knit or crochet, usually I use a blunt end tapestry needle, which is what you see here, um, but for doing those stitches, I'm gonna use a slightly sharper tapestry needle. I mean, it, you, it would work with this. You could do it. It's just a little bit annoying. So we'll talk a little more about that when we get to that point.
Um, you don't have to be so careful about what stuffing you're buying. I'm just letting you know because this is something that was surprising to me. Um, OK. And you just need like little bits of that stuffing, you know, to fill out your pumpkin. And, and that's gonna depend, you know, how much you need is gonna depend on how many pumpkins you're making on your garland.
So, um, you know, just keep that in mind. And the last thing that you'll be needing is some jute twine. So this is a 3 millimeter twine that I bought. Um, it's just you can find it like in the gardening section of places or at craft stores. I bought this at Amazon and I, I think I linked to it.
Did I link to this? Yeah, I did. I linked to it in the, um, in the list of materials in your download. Just because that way you could, you know, see what it looks like up close and see what this actually is, so you can check it out there. All right, um, let's see.
Oh, we've got a bunch of good mornings coming in. Um, good morning from Kearney, Missouri. I've been there. We've got a hi from Cambridge, England, awesome, and Sandy is saying lovely afternoon from Austria. These pumpkins are super adorable.
Thank you. And Judy Sanders says, so happy this notice popped up. I love knitting and I wanted to knit pumpkins. I'm from Folsom in Northern California. Cool.
Well, welcome all of you guys. Thanks for saying hi. I appreciate that. All right, so let's get started creating, um, our little pumpkins. So to begin, um, part of the reason that, um, I'm saying that this is a good, uh, like a, a good project for those of you who are newer with the double point needles, and especially if you're knitting something that is like a little Amigurumi or a little toy, a lot of times we start out with just a few stitches on our knitting needles, um, and we have all these knitting needles kind of going at the same time, and it's very awkward for the first few rounds, really.
But because we're gonna be starting our pumpkin at the stem end and we're, we're gonna be doing a little bit of eyelet cord here, and if you don't know how to do eyelet cord, that's OK, it's very simple and I'll be walking you through it. Um, we're gonna do a little bit of eyelet cord here, and that gives you a little bit to kind of hang on to as you're knitting. Um, and then once we start working, you know, and that's only with two knitting needles. You have your eyelet cord on two knitting needles, and we'll, we'll get into that in a minute. So it's not so much to manage.
And then by the time you're adding more knitting needles to your project, then you have a little something to hang on to. It makes it a little bit easier. So we're sort of easing you into the double point needles. Also, as a side note, if you just really do not like double point needles, you're somebody who is already, You know, maybe you're already familiar with using, um, uh, using two circular needles instead of double-point needles, you can completely do that instead, of course, if you'd like to do that. All right, so we are going to cast on four stitches.
So you'll just make a slipknot, however you like to make slipknots. I'm gonna place that on my needle. And then you can cast on however you like. Um, I always do the German twisted cast on because this is like my go-to cast on. I like how the edge looks.
Um, so actually, here, let me show you how to do that, in case you've never done that before, just in case you're curious, but we do have, um. I'm sure that there is a video on this on the Knitting Circle website if you'd like to check that out if you need a little bit more information on that. So we've got our slipknot on our hook, and then we're going to hold this in the slingshot position. So we've got the strand connected to the ball here, and then the strand, the ending strand right here. We're going to go underneath here, underneath, like, basically that makes a loop, and then we're going to go down through.
And then over, across the top of that loop, and pull that little bit through here. I'll do that a couple more times here. Underneath, grab that strand, bring it across the top. And pull that through that little triangle right there. And like I said, you can use any cast on you'd like to here, you don't need to use this cast on.
I was just slowing it down in case you wanted to see what I was doing there. OK, so we've got four stitches on our needle, and we're going to start working in i-cord. So when you do that, here is the strand that's connected to the ball right here. Um, we are going to just slide this over to the opposite point like that, and we're going to bring the strand that's connected to the ball across the back, and we're going to knit with that. So in this very first stitch.
So I'm going, and I, I like to hang on to this beginning strand because I feel like it makes things slip around a little less, um, and it's a little less awkward. So I kind of hold that in my fingers like that. And I'm gonna go ahead and knit each stitch across. So there's my first stitch, and when you knit the beginning stitch. You can, as you're pulling it off the needle, you can kind of pull it, pull on that strand right here just to make sure that it's nice and tight.
I mean, it doesn't have to be super tight, but you know, you don't want a ladder across the back, and I'll explain that a little bit more here as we go. So we're going to go ahead and knit the next 3 stitches, so 1. To. And here's the last one. There's our 3rd 1.
And then we've ended with our yarn tail on this side. Once again, we're gonna slide this over to the other tip. I'm going to grab that with my finger. This is the yarn tail that's connected to the ball, and that's just going to be brought straight across the back, and we're going to do another row of knitting here. So as we make that first stitch and pull it off our needle, I just kind of cinch up on a little bit.
And then go ahead and knit the remaining 33 stitches here. All right, that was our 2nd row in I cord. Really, it's a round. We're working in the round, even though it doesn't look like it. We're gonna slide it across and here's the 3rd round of I cord.
So we're gonna knit across 12. 34, and we'll do one more round. We're gonna slide that to the other end and just bring that across the back. And knit 4. All right, so there's our little stem.
How cute! Um, oh, we've got lots more hellos. We've got a hello from Charlotte, North Carolina. Oh, dry polyester packing, just bought some at Michael's. That's what it's called.
Thank you, Judy. I, I wasn't completely sure of that. Yes, dry polyester packing. Um, let's see, and Owen Madison says hello from a rare rainy South, uh, California. OK.
I hope it's a lovely rain. And Jennifer says good morning from Michigan. Hi Jennifer. And we have a Lillian from, uh, Colombia, but I live in Lakeland. Oh, you're from Colombia but you live in Lakeland, Florida.
Awesome. Thank you for joining us. OK, so we've got our four rounds of ICOD. And now we're going to start increasing as we add more needles. So what we're going to do is bring this yarn right over to the beginning again.
On our first knitting needle, we're going to knit two stitches. Um, we're actually just going to be knitting this first stitch, but we're going to knit it through the front and through the back, and that's how we do an increase. So we're going to slide our needle through there and we're knitting just like we normally do. And then we're gonna knit back here. OK.
Actually, I'll go ahead and pull that off my needle, and then I'll show you that again. So this is called, it's abbreviated KFB, knit front back. OK, so then we're gonna pull that off our needle. And if you're newer to double-point needles, try to do this first round fairly tightly so that your knitting needle doesn't want to just drop out. See, I can actually pick this up and it's not gonna fall out.
Um, this is also helpful if you, my knitting needles, they're plastic, but they have sort of a um. Matte texture to them. They're not slippery plastic, um, and I have noticed with bamboo needles, those are great for beginners who um haven't worked in the round on double-point needles before that I recommend those or sort of a matte plastic like this. If you're using metal double-point needles, you can certainly use them, but they do tend to be a little bit more slippery. Um, they just kind of want to slide out of your stitches if you're not making them quite tight enough.
So, it does get easier the more stitches you get on your needles; then they're not just gonna slide out. So, when you just have a couple on and you're, you're just letting it hang there, sometimes they just fall out. But when you have your first knitting needle, we're going to bring in our second knitting needle, and we're going to do the same thing in the next stitch. OK, so there's our first knitting needle. We're going to bring in our second knitting needle and we're going to do the same thing in the next stitch.
So this, we're going to knit in the front. So that's how we normally do right there. So we're knitting there and then we're going to knit before we pull that off our knitting needle, we're going to place our needle through that same stitch, and we're going to knit through the back. Whoops, here we go. OK.
So now we've got 22 stitches used, and we're just going to drop that, and we're going to add our next knitting needle here. And we have 2 stitches left from our eye cord. So we're going to do knit front back here and knit front back here, and they're both going to end on this needle. OK, so we're going to knit the front. and then knit the back.
and knit the front. and knit the back. Just like that. OK, so now we have a total of 8 stitches. We had 4 and then we did knit front back in each of them.
So we have 22 stitches where there was 1 before, so we've got 8. And if you take a look at your knitting needles, just make sure that they're in the right place, that nothing is twisted around. You're gonna want to just look right here, I'm gonna bring this. This, um, ending tail right between those two needles. Here is our next needle here, and you can tell.
What order things want to be in if you just kind of pull up on your fabric and make sure that you've got that little line that goes across right here. That's from knitting in the back. So this was knitting in the front, knitting in the back. That one should come second on your needle, OK, so knitting in the front, knitting in the back, same thing here, knitting in the front, knitting in the back. That's how you know your needles aren't twisted around like this or something like that.
I mean, you can also just sort of try to twist or untwist them if they feel like they're twisted. Um, but just take a little look at those and make sure that they are in the order that they're supposed to be in. And then at this point, you can cut this, um, ending yarn tail. So, I'm just gonna snip that there. We don't need it anymore.
Don't cut it too short though, because you don't want that loop to elongate and for it to pull out. Just give it, you know, at least 4 inches or 6. Inches, because you're gonna have to weave that in later. All right, so now we're gonna join our next color. So, I'm gonna be using this sort of orangey gold here.
And to add that next color, we're going to just let that color just sort of drop to the front. I know that seems weird. Why would you want your yarn tail on the front, but to me it just is easier to hang on to if it's coming, going from the front, and then this strand right here is connected to the ball, OK, right there. So, I'm gonna go ahead and reposition my needle so that this needle, the one that I'm about to work across, is on top of the next needle. Now this could be a personal preference thing.
You don't have to do it exactly as I do, but I wanted to show you this because I find it's so much easier to hold onto if my hand is underneath, like as I'm knitting with my right hand here, if my hand is here and this needle is above it, that really does help. OK, so uh this is coming from the front and I'm just going to go ahead and do a knit front back in each stitch around with this new color. So I'm hanging on to the new color here. And I'm going to insert my needle and knit through the front, and before I pull it off my needle, I'm going to knit through the back like that. And then I can pull that off onto my needle.
Now I'm going to do the same thing here, knit through the front, knit through the back. Just like that. And I've got my, this needle is now free, so I'm gonna use that needle for knitting the stitches on the following needle. So, we're gonna knit through the front. And then knit through the back.
Pull it off her needle, knit through the front. And through the back. And pull that off. And now here is our 3rd needle of the round. The reason that I distributed my stitches as I did was so that it would be really obvious when we were on the last knitting needle of the round, because that's the one that has double the amount of stitches of either of the other two needles.
But right now it doesn't because we haven't worked this, but it will when we're done with this, with this, uh, round here. So we're going to knit through the front, knit through the back. Drop it off the needle, knit through the front, then knit through the back. Drop it off, knit through the front, knit through the back. Knit through the front and knit through the back, and now that last stitch because we cut it and it's just sort of hanging there, that one tends to get a little stretched out; we worked into that stitch right there from the previous round but you can just tighten that up by pulling on that ending yarn tail.
Just so that loop doesn't get too, too stretched out. You can always tug it later as well, when you get to weaving in your yarn tails, or your yarn ends. OK, and I like to leave my yarn tails on the outside for weaving in later. So I'm gonna bring, I'm just bringing that beginning yarn tail to the outside here. All right, let's see.
Oh, OK, so we've got a question or comment about an affordable project, yes, especially because you can use scraps. And what is I-cord? So I hope that I answered what that was when I, um, began working it. I'm sorry, I must be getting this question a little bit late. I apologize for that.
The I-cord was just as we were working at the very beginning, we knit across and then we slide that whole bit to the right again and then knit across. Instead of knitting on circular needles around and around, it just gets easier to slide it over and then bring that, um, you know, our working yarn to that first stitch and then just begin knitting it across. Um, but that's just basically the name of the process when we worked this stem here. And of course, after this is over, you can go back and watch any part of this, you know, you can watch the whole video again. So if you need a review of the I-cord, you can go ahead after this is over and check that part out again.
All right, so we've got some hellos from West Tennessee and Canada and Phoenix, Arizona. Hi, you guys, thanks for saying hello. All right, so now we're going to start, um, we're going to do just one round even. OK, so we're just going to be knitting in each stitch. So, and like I said before, um, I like to adjust my double point needles so that they go underneath.
On the right side, and then on top of the next needle on the left side, that just seems to help when it's at that type of an angle, then my hand can fit here. If I put it the other way, like this, and I'm trying to knit here. It's really hard for me to knit here with this needle in the way, and then, then as I'm pulling on this needle, the needle that I'm knitting from, it's pushing on this needle, pushing it up. So I find that to be very annoying. So I always just sort of arrange them like this, with this needle underneath that needle, and then the end of the needle on top of the following needle, if that helps, um.
But there's not a wrong way to do it. I mean, you can't, you don't have to do it this way, I guess is what I'm trying to say. You will find whatever way seems comfortable and less awkward for you. I just am pointing this out because when I first learned how to use double-pointed needles, I didn't think about things like that, and I just remember thinking it was really awkward. And then once I figured out that I always just need to angle my needle a certain way, and then there's room for my hand, um, then that just seemed to make everything easier for me.
OK, so here we are. We're just going to be knitting each stitch across, and again, I'm going to be holding onto this beginning yarn tail with my fingers as I knit this first stitch, um, and that's because I'm a continental knitter, that makes it easier for me because I can just hang on to that. But if you knit with the yarn in your right hand, if you do English style, um, then you won't really be able to do that, but you can go ahead and wrap your yarn like that and pull it through. Sorry you guys, I'm, I am, I have actually been practicing to be a better English style knitter because I know that there are so many of you guys out there who knit English, the English style way, um, or the thrower way, or however you like to say that, um, and I'd like to be able to be fluent in both ways so that I can show you guys, and I'm getting better at it, but I, you know, I've been knitting continental style basically since I started knitting, and um it is a struggle for me to, to stop and remember how to knit the other way. But I am practicing.
OK, so I have just eight more stitches left here on this last needle. All right. So now, um, we are gonna do one more round with increases. So, it's exactly the same style of increases we were, as we were doing before. We're gonna do a knit through the front.
And then, before we drop it off, we're going to knit the back of that same stitch and then drop it off for a needle. So knit through the front. It through the back, through the front. Through the back. Knit through the front, knit through the back.
And then, we'll do that again here. Knit through the front, knit through the back. We're gonna do that all the way around. And then, we should have a total of 32 stitches. Let me double check that.
Let's see. Yeah, that should be right. It through the front, it through the back. And then that's all the increasing, and all the shaping that we need to do. Well, I shouldn't say all the shaping.
We are gonna do some decreasing towards the end. But it's actually pretty simple. Um, you're basically doing 3 rounds of increasing in this pumpkin. And then later on, we're gonna do 2 rounds of decreasing at the very end. But other than that, it's just knitting around.
All right, so we've got all of our stitches on and we're ready to just kind of work in the round at this point. So you can go ahead and just knit and knit and knit and knit many, many rounds until, let's see, let me just check with my pattern here and I'll tell you. How many rounds are knitting? Oh, and I should mention too that. For this pattern, even though it looks like.
This one might be a bigger circumference than this one. It's really just because it's the longer pumpkin. I know that probably doesn't make sense until you start stuffing it and seeing what happens. Um, they are exactly the same pattern, the same number of stitches. Everything's exactly the same for all three or all 4 of these different slightly different sized pumpkins.
They are all exactly the same except for the rounds that we're working even, which we've started now. We're just going to work around and around and around. And this goldish one, I worked 33 rounds, um, for the rusty orange one. This one was only 27 rounds for the The sort of white tweed one, this one was 23 rounds and for the little sort of bluish. One I did 21 rounds.
So, and this is all written in your, in your pattern, but you don't need to follow exactly how many rounds I did — like somewhere in the ballpark of those amounts of rounds, you can just kind of make it up and have pumpkins of different sizes. You know, this was sort of a way for me to say, hey, here's the difference between the 23 rounds and the 30, what was this? Let's see, yeah, 21 rounds and 33 rounds, sorry. Um, those are how different they're going to look, and so you can really knit as many rounds as you like for whatever shape pumpkin you feel like making, or how much yarn you have. You know, this, if this is a scrappy project, you might be feeling like you're running out of yarn, so don't worry about it — as long as you get enough to make, you know, the smallest pumpkin out of it, you can go a little further if you'd like.
Or you can just make the smallest size; it doesn't matter. Ok, so you're just gonna keep knitting around and around, and you just every time you make a round, you just knit your way across, and then you use the the double point needle that you've just freed to the next section. Ok? So we're just knitting it across here. Knitting each stitch.
and now we've read this needle and we can use that to knit across this row here. Or this section, I should say. so, and you'll know that you're at the end of the round because the very last needle is the one with all the many stitches on it. It's going to have twice as many stitches as either of the other two needles. So that's an easy way for you to kind of realize, oh yeah, i need to pay attention.
What am I doing on the next round? Oh, i'm still knitting. And so you'll just keep on knitting until you have the proper amount of rows, and I'm going to show you how you can count those up in just a second here in case you sort of lose track. which seems inevitable when you do that many rounds, right? Even if you have a round keeper or a way to count your rounds.
Um, so that's what it looks like. You'll just keep knitting and knitting and knitting. And for my pumpkin, this is the longest pumpkin. So this is the one that has 33 rounds. And this is about what it would look like, okay.
It looks very long, but once we start doing the little stitches in it, it's gonna shrink up just a little bit. By the stitches, I mean we're gonna be doing these long stitches to create these little sections in the pumpkin. So if you're not quite sure how many rounds you've done, if you take a look at the stitch that is the very first stitch of the round, so that would be the one right after you've worked across all of these stitches, you know, the needle with the most stitches, you can follow that one down all the way down to where it turns green, okay? And if so, if you want to count. The very first stitch of the pumpkin color, the you know, after we changed color to this orangey color, that's gonna count as round number five.
So 5, 6, 7, 8, 9, 10, 11, 12, 13, 14, 15, 16, 17, 18, 19, 20, 21, 22, 23, 24, 25, 26, 27, 28, 29, 30, 31. 32 and 33. All right, so we've got 33 rounds in this pumpkin color here. And that's where I'm gonna stop doing my, you know, just working even section, and now I'm going to start doing some decreasing. So, um, oh, we've got a.
Oh, we've got a question about being left-handed. You're a very great teacher, but I'm very left-handed. Do you think there'll be a day that you can post something live, how to knit crochet for left-handed people? Okay. Hmm, I don't know about that.
I think I have to do a little more research and practice in that for me to be able to show you knitting with left-handed because I think most people that most left-handed people that I know that knit are using either continental like me or maybe they're knitting the English style too, but I think because it's kind of a two-handed thing. Usually there isn't, you know, most people don't knit the opposite direction who are left-handed, I think, although I could be wrong about that, but as far as left-handed crochet goes, that is a whole different thing because when you're crocheting, all of your stitches are. Well, you hold a hook, it's just one hook, of course, and you're holding that in your dominant hand, right? So if you're a right-handed crocheter, you would crochet from right to left. If you're a left-handed crocheter, or crocheting with the hook in your left hand, you'd crochet from left to right.
So everything gets very confusing, especially for, you know, left-handed crocheters. So what I always tell our left-handed crocheters is if you flip the video, if you can go into your screen settings or watch it in a mirror or somehow flip the video horizontally, and there's actually an easy way to do this if you're watching. If you watch on YouTube, you can actually there's a, um. There's an easy way to flip your screen. Uh, maybe I can come back and post that, but or you can probably even just Google it, how to flip your screen in YouTube, um, but you can, you can flip your screen horizontally and then it'll look like I am crocheting left handed, and all the stitches will look like how you would be making them with the hook in your left hand.
Um, so that helps a lot for left-handed crocheters because you can basically make any crocheter you're watching a video of look like they're crocheting left-handed style. Um, yeah, this is a whole big topic I guess. So I think I need to do a little more research about the knitting thing, so. Maybe we'll just put a pin in that and come back to that later. Um, let's see.
Oh, we've got Judy says I'm going to try continental because it seems like it's easier to make the stitches tighter. I find it that way, but that's probably just because I'm a continental knitter. Maybe other people who are fluent in English knitting and continental, if you guys want to weigh in here, um, and let us know if you feel like it's easier to make your stitches tighter, if you're continental, if you're knitting continental style, um, then let us know because I'm curious about that too. OK. All right, so now we're going to start doing our decreases.
So we're going to just be knitting two together all the way around. So in order to do that, we're going to basically treat these two stitches as though they're one stitch. So we're going to insert our needle from left to right through these stitches, and then we're going to wrap the needle and pull it through just like we're doing a regular knit stitch. So we're just basically treating two loops as one, and doing a regular knit. So we're gonna go through both those stitches.
And bring it through. Both those stitches, bring it through. Two stitches, bring it through. Let's see. I think I got an extra loop there somehow.
What did I do? OK. I think I didn't quite get underneath that first loop, or the most left loop there, but we're good now. So, that should be four stitches on the first two, each of the first two needles. So, we'll do that again.
So we're just knitting these two together. Sorry that this is so similar to my yarn color. I'm gonna switch that out. I was running out of the, the white needles here, so. I threw in an extra bamboo one, but that's.
not very helpful on this color of yarn here. We'll just kind of get rid of that one. And I'll pull one of these out. Here we go. And here is my last side, the one with all of the many stitches, and we're gonna just be knitting two together all the way across.
All right. There is our last two stitches of the round, knitting those together. And now we're going to do one round of just, uh, working even, so just making one knit stitch in each stitch around here. And always, whenever you're switching to the next needle, so you knit across this needle and you're about to knit your next stitch, it's always good to make that stitch nice and tight. So really, I'm really pulling on this here as I'm dropping that off because that will lessen the, uh, we call that a laddering kind of effect or a ladder, um, when between, it'll probably ladder somewhat.
Let's see, well, not too much. I was pretty good about pulling that tight, but you can see, like, between any two rows of stitching, if you don't make that first stitch kind of tight on your, like, on the first stitch of the next needle, then sometimes you can sort of see these little horizontal bars, you know, that run along your stitches. Um, you can see those and there's a little space between, and you can see where people have switched from one needle to the next, so. You know, right here, I'm switching to the next needle. I'm going to make a special effort to pull, pull this a little tighter here to keep that from happening on that very first stitch.
All right. So now at this point, we're going to stuff our pumpkin. And we're just gonna Push, I'm just leaving my needles in there, just make sure they're nice and centered so nothing falls off. You wanna drop any stitches here. And when you push this down in there, um, when you're, excuse me, when you're stuffing something, it's good to kind of wiggle your fingers and get that fiber fill to really get down in there.
You know, just put a little in at a time. Don't just put like the whole wad in and try to get it to push down in toward the stem because it might not work. So what I'm doing, I'm doing this on the inside of the pumpkin to kind of try and mix that. Uh, fiber fill together and really fill out the top of my pumpkin there, OK? So you can see what that looks like, and we're gonna add a little bit more in there.
And try and mix this fiber fill in with the fiber fill you already added so it doesn't look like two separate blobs that are kind of just sitting next to each other. You kind of kind of mix those in with your fingers as you're putting it in. And if you're having a lot of trouble with this, you know, you could certainly break off. I've seen people, you know, break off tiny amounts and put it in, and that that does keep that from happening. It seems like it takes forever though, so I don't usually use that method, but um.
But you do need to kind of reach in there and get those two. Clumps of fiber fill to kind of intermix a little bit there. Mm. I don't think I needed all of that. There we go.
So it should be fairly firmly stuffed. You don't want to see, you know, you don't want to stuff it so much that it's distorted and it's really um gonna be difficult to put these little stitches in. So, but it should feel fairly firmly stuffed. Otherwise, you might not be able to keep the stuffing all up inside the top of the pumpkin and um it it might just not be as nice of a shape later. All right, so now we're gonna do another round of decreasing.
So it's a little bit awkward because you've got the stuffing in there, but you can still do it. So just kind of push that out of the way. And we're gonna be knitting two together again. Oh, here you can see a little bit of that laddering I was talking about because I wasn't pulling those stitches quite tight enough there, but that's OK. It's not so bad that, um, you know, I need to undo anything or anything like that.
All right. So this part, just give yourself a little extra time because you've got this, you know, a stuffed thing hanging off your needles. So it is a little bit awkward. If this is just really frustrating to you to do this last round of decreases, what you can do is you can just run your yarn through all of the remaining stitches and don't worry about that last round of decreases. It'll still turn out cute, um, you know, you don't have to do this.
I feel like this makes it a little bit easier to get the very center bottom of the pumpkin to look really neat and tidy and you don't have um a gap when you kind of cinch in all of those stitches. So I really like to do this last round of the the decreasing of the knit two togethers. I think that it helps, but you know it is, you know, if you're. If you're newer to knitting and you're just having a hard time with these double, you know, you've got the newer to knitting, plus the double point needles, plus you got the stuffing in there. It, it could be a little frustrating and there's, you don't need to make yourself, you know, don't make yourself crazy over it.
Just kind of run your needle through those last stitches and I'll show you how to do that now. So whether you have um 8 stitches, what I was, which is what you should end up with if you follow the pattern, or even if you have 16 stitches, you can still do the next step um this in the same way. So we're going to Make sure we have, I would say at least a yard. Just to be on the safe side of yarn there. And um.
Here, I'm going to put it on my blunt needle just so you guys can see what's happening. And then you can go ahead and thread your yarn onto a tapestry needle, and then we're going to run that tapestry needle through each of the remaining loops. So, and as you do that, you can pull your, your knitting needles free. So we're gonna just pull those through. Pull these two through.
And go through these four. That, and then we can go ahead and just pull on that and tighten it up. Till there's no hole, and I always, no matter whether I'm doing a hat or a toy or whatever, I like to run through this a second time if I can, if it isn't too awkward or if the yarn isn't too snaggy. I will just run my, my yarn through the exact same path one more time. And if you miss a loop here or there, no big deal.
I just like to do that because I feel like it's a little bit stronger. You're not just relying on one strand to keep all of those loops held together there. OK. So now we're gonna do a little bit of, uh, shaping with basically like a couple of long stitches. So if you're not a sewer, that's OK.
Um, I'm gonna be showing you how to do this. It's really not tricky, I don't think. Um, but if you guys have any questions about this, definitely let me know. OK, so we're going to be taking our needle and we're gonna go from, this is where our, our yarn is coming from, this the bottom of our pumpkin, and we're just going to go in. If we just sort of pick one of these, uh, one of these ridges here from 11 columns of stitches, and just follow it up.
And you're just going to push your needle from top down to the bottom. And so this step is much simpler to do on one of the shorter pumpkins like this, because your needle will just pop through. I wanted to demonstrate it on the tallest pumpkin because it's the most awkward, um, just so that you have all the information that you need. But just keep that in mind, like if you're new at this and you feel like this is going to be tricky, you can absolutely just make like shorter pumpkins and not worry about um, you know, trying to push your needle through, but I think you'll find it's easier than you think. All right, so even if you have a pretty short needle like this and your pumpkin's really tall, you could just take your needle and push it down through the center of your pumpkin and it's going to come out down here.
And what we're aiming for is making a big stitch right here that's going to connect this end to where my needle is and then. So that's like right here, okay? And then we want our needle to come out somewhere close to the opposite side. So I like to think of this as being kind of like the beginning of a peace sign. Okay, I'm gonna turn it this way.
So just imagine there's going to be a stitch here. I'm just gonna simulate where the stitches are with these needles. We'll see if I can do this. So, let's say there's a stitch there. And then I want there to be two other long stitches kind of towards the bottom of the pumpkin, like this.
I guess it isn't exactly a peace sign. There would be another little line right here. This is kind of more like the Mercedes sign, but I think you want this to be a little bit wider than this section. So this, this is the first stitch we're making, and then we're gonna make these two just a little closer together, but exactly opposite of this, okay? If you can see, kind of see this formation here, and if it helps, you can put little stitch markers there to give you something to aim for, or do a little wash-away marker on there or something like that.
Also, keep in mind that these are organic shapes, and if your pumpkin doesn't have perfectly dispersed little lobes around your pumpkin, nobody's going to notice or care. It's going to be cute. My pumpkins are not perfectly you know, like this lobe is a little wider than that one. It's fine. It's like an organic, cute shape.
It doesn't, it really doesn't matter. I'm just trying to give you ideas on what to aim for here. Okay, so we're going to be running this through from top to bottom and see, because I'm using this dry-packing stuff, my needle sometimes gets a little stuck in there and I have to kind of wiggle it to get it to come through. So, on the next stitch, I'm going to switch to that sharper needle. Okay, and so to make your needle come out when this is so long, you just have to push it.
See how I'm just squishing this pumpkin? And now we can see the tip of my needle there. Can you guys see that tip of the needle sticking out here. So I'm gonna grab onto that. And pull that through.
I'm just gonna kind of let that lay on top of there for a second as I'm gonna switch out my needle to the sharper needle. You guys will not likely have to do this unless you buy that dry packing, uh, fiber fill as well, which actually doesn't work very well. You just, it just helps to have a sharper needle. OK, so we're going to pull on this to give it a little shape, see how it kind of dimples in like that, and we're giving it a little line. Pull in on it a little more than you think you're going to, because when you do, the next couple stitches, those kind of bring it in a little tighter too, and then this one tends to feel a little loose.
So I always bring it in a little more than I think I want to and then I'm gonna go ahead and make my next stitch. OK, so remember here where we went from here now we're going to go. We're gonna bring our needle from the bottom. And go through the top right here, and we're gonna come out the bottom. Always aim for somewhere close to the center where all those stitches come from.
OK. And there's our next little stitch, like that. And now we're gonna do another one over here. And then next, we're going to make another stitch right through this side here. So I'm going to come out.
There we go. All right. So, so far, we have 3, 1, 2, 3. I'll show you that from the bottom here. 1, 2, 3, and then we're gonna do 1 here and 1 here.
The other thing too is you really can have as many of these little sections as you feel like doing, um. You know, there's no. There's no rule that pumpkins need to have this amount of lobes. I mean, that's just silly, but the reason that I'm telling you so specifically where to put all these lines and all that is just so that you don't end up with one spot that just seems really lopsided, like it's too big to divide it again, but it's not really, you know, it's, it's too big that you want to divide it again but it's not quite big enough if that makes sense, um. And here is our very last one.
We're gonna go down. To the middle here. All right. So that looks pretty good. Um, I'm going to go ahead and weave in my tail, and you might just think, well, can't you just push it through and cut it off?
But you, you can, but I don't think it's going to stay very well. This is the part where you really need to just kind of weave it back and forth through the fabric. I'm really splitting some of these strands of yarn here. To make sure that these loops are not going to come undone, because it is under a, you know, a certain amount of tension. Because your pumpkin is pretty well stuffed and you're using it to create those grooves, you know, you don't want it to just sort of loosen up and undo itself, and then you'll have a, well, you know, then you'll have more of like an orange than a pumpkin.
Or just a pumpkin without the little lobes, I guess. All right. Once you've woven it back and forth a few times. And really kind of gone through, you can feel it going through the fabric and not just the stuffing. And you can cut that off.
And then I always do, like, a little bit of, you know, I'll check it out and see if it looks good. This looks a little extra lumpy over here. You can do a little bit by pulling, you know, you can kind of move those longer stitches around. You can also use your needle to poke in here and then kind of grab some of that fiber fill. I'm basically like grabbing it and pulling it up.
If you feel like there are areas that got flattened out. You know, you can kind of fix that by stabbing in there and kind of moving it around a little bit. This is called the finessing stage of making the pumpkin. You know, really you don't have to do this at all, but I just wanted to show you that there, you know, if in case you're stitching it up and you're like, oh, that looks wonky there, uh, you know, you don't feel like you don't have any other options, but you can certainly just fix it with your, you know, digging in there a little bit with your needle to kind of move that fiber fill around. And then you just gotta weave in your ends.
So I'm just weaving in the pumpkin-colored end first and. I like, I said, I like to go in a couple of different directions. Just make sure it's really secure. And then we'll weave in these two ends as well, OK? And I'll finish that part later.
But I want to show you how to string these up onto your little jute cord. Let's see, let me just check in and see if I have any more questions. We got some more hellos. Oh, hello from Indonesia. Cool, and from Central New York.
Oh, thanks for being here, Christine. OK, thank you guys for your compliments. Um, so to add all your little pumpkins on there, so what I did is I figured out how long I wanted my garland to be, and then I added another yard onto that because some of the yardage is going to be taken up by a little bit of loops on each end and then some knots between your pumpkins. Definitely is not going to be a whole yard's worth of twine, but it's better to be on the safe side. So then, once I get my, here, I'll just do like a little simulation of that.
So let's just say I wanted my twine or I wanted my piece to be, you know, maybe about this long and then I added another, I added another yard onto it. So I'm just gonna cut that off. What I would recommend is once your pumpkins are all done. Arrange them in whatever order you think you want to put them in. That way you can see, like, don't just start putting them on as you go because you might not like how the colors look if you're doing them in a bunch of different colors.
This is not to say it has to go in a specific order, you just might want to kind of rearrange where things are, you know, sometimes certain colors jump out at you more like yellows or whites, and you wanna make sure they're kind of evenly dispersed throughout your garland. So figure out what order they're gonna go on in, and then you can just What I did was I started with the center pumpkin and I put that on first, and if you have an even number of pumpkins, like I do here, just kind of place it slightly off center. So what I did here, we'll find, we'll find the center of our garland, so that would be right here. So I'm gonna put I should have brought a, oh, I do have a safety pin. I'm gonna put a little safety pin in here now.
You can use just a knot, um, piece of tape, anything to mark that little center of your piece. Also, you don't really need to mark it. You can just slide your pumpkin on and then double check it again later, but I'm going to mark that so you guys can see this is the center of my twine right here. And let's just say, OK, so let's just say we're going to do all five of these pumpkins on my garland, OK? So if I wanted to put this white one in the center, so this is this would be my center point.
I would put that one on first and I'm just placing that twine in through my tapestry needle and then just sending it right through the stem. And I like to go not all the way up at the top, but somewhere like through the middle of the stem like this. Just pull it on through. And then bring it to the center of your garland like this. There's the center.
And then I made a knot on each side of my pumpkin because I just knew if these were gonna be at kind of an angle or swooping down, I did not want my pumpkins to just have gravity slide them around. I really wanted them to be anchored at certain points. So I'm just gonna go ahead and make a little knot right here next to the stem. Like that. And this is big enough to not go through my stem.
I mean, yeah, maybe if I really yanked on it, I could have it go through, but you could certainly do a second knot, um, right on top of that one to make it a little bit bigger if you want to be absolutely sure it couldn't move. And then I did a knot on the other side of the stem as well. Just like that. And then your little pumpkin is secure in there. And then you can measure, you know, a distance away, whatever, you know, if you, if you measure out on your garland, you can put a pin, like this is where I want my last pumpkin to be.
You know, on both ends of it. And then you can figure out how many pumpkins you have and lay that all out, you know, place your pumpkin there on your twine, and then maybe one goes there and then you can put pins in it and know where you want to put your pumpkins. Um, or if you just wanna make this pumpkin garland, maybe you're making them to sell, you know, it doesn't matter to you how far apart they are. You could just pick like seven or eight inches apart. That's where you're gonna make your next, your next, um, knot, which you're gonna put on there next.
Before you slide your pumpkin on. So, you'll put your next pumpkin on around here, whatever that measurement is, if you selected a measurement, and then you can go ahead and thread that through your next pumpkin. So, I'm threading that through, kind of at the midpoint of the stem. I'm bringing it right up until it gets to my little knot right there. And then I can go ahead and tie a knot on the other side.
Just to keep them from sliding all over the place. And then what I did for hanging, um, you know, this will just have to do with how you like to hang your garland or whatever you'd like to do. I just tied a little, like, let's just say I have all my pumpkins on my garland and I'm ready to go, and I figure out how much longer I want it to be or what point I want to have a loop or hanging loop or something. Um, so like if I wanted to have my loop here, I would just fold that and then just make an overhand knot. Where that is right here.
And then I just tied that nice and tight, and then I actually ended up because I, uh, because I'm always worried about things coming undone, um, I just tied a couple of extra knots here. With that little piece. You could certainly add a tiny dab of glue or something to keep your jute from undoing, but I tied maybe like three or four knots and then I just cut it off like that. And it's just, you know, it's a little rustic knot. That's what it looks like.
Um, and I thought it looked very cute. All right, let me just double check and see if I answered everything. Oh, we've got a comment from Catherine Howdy from Trenton, Texas. Great fall project for sure. Thank you.
Also, a bunch of these in various size pumpkins in a rope bowl would be great on a table. I agree, that would be very charming. I love that idea. Thanks for sharing that with us. OK, you guys, thank you so much, all of you for being here.
I really appreciate you guys being so active in the chat and saying hi and and, um, just being like the friendly bunch you guys always are. I appreciate it, um, and I just want to let you know right before we wrap up, if you guys are crocheters or interested in crocheting, in about half an hour, a little less than half an hour, I'm going to be doing another live tutorial, and it's going to be on this little tiny ghost. So if you'd like, if you're interested in making this little ghost, this is a crochet project you can join me for that in about 25 minutes or so. All right, thanks to you guys. Thanks for being here.
Bye everyone.

Share tips, start a discussion or ask other students a question. If you have a question for an expert, please click here.
Already a member? Sign in
No Responses to “Mini Pumpkin Patch Garland”